> ## Documentation Index
> Fetch the complete documentation index at: https://docs.getimpala.ai/llms.txt
> Use this file to discover all available pages before exploring further.
# Install Impala in your VPC (AWS)
> Deploy the Impala data plane in your AWS account.
Impala runs in your AWS account. This guide walks you through deploying the Impala data plane — from downloading the deployment package to your active platform.
## Prerequisites
* An Impala invitation from your Impala contact
* Terraform installed (use the latest version — [terraform.io](https://terraform.io))
* AWS credentials configured on the machine you'll run the deployment from
**Time to complete:** \~30 minutes (a few minutes setup, then automated deployment)
***
## Step 1 — Download the deployment package
1. Log in to the Impala platform using the link in your invitation email
2. You'll land on the **Infrastructure Setup** page
3. Click **Download Assets** — this downloads `terraform-assets.zip`
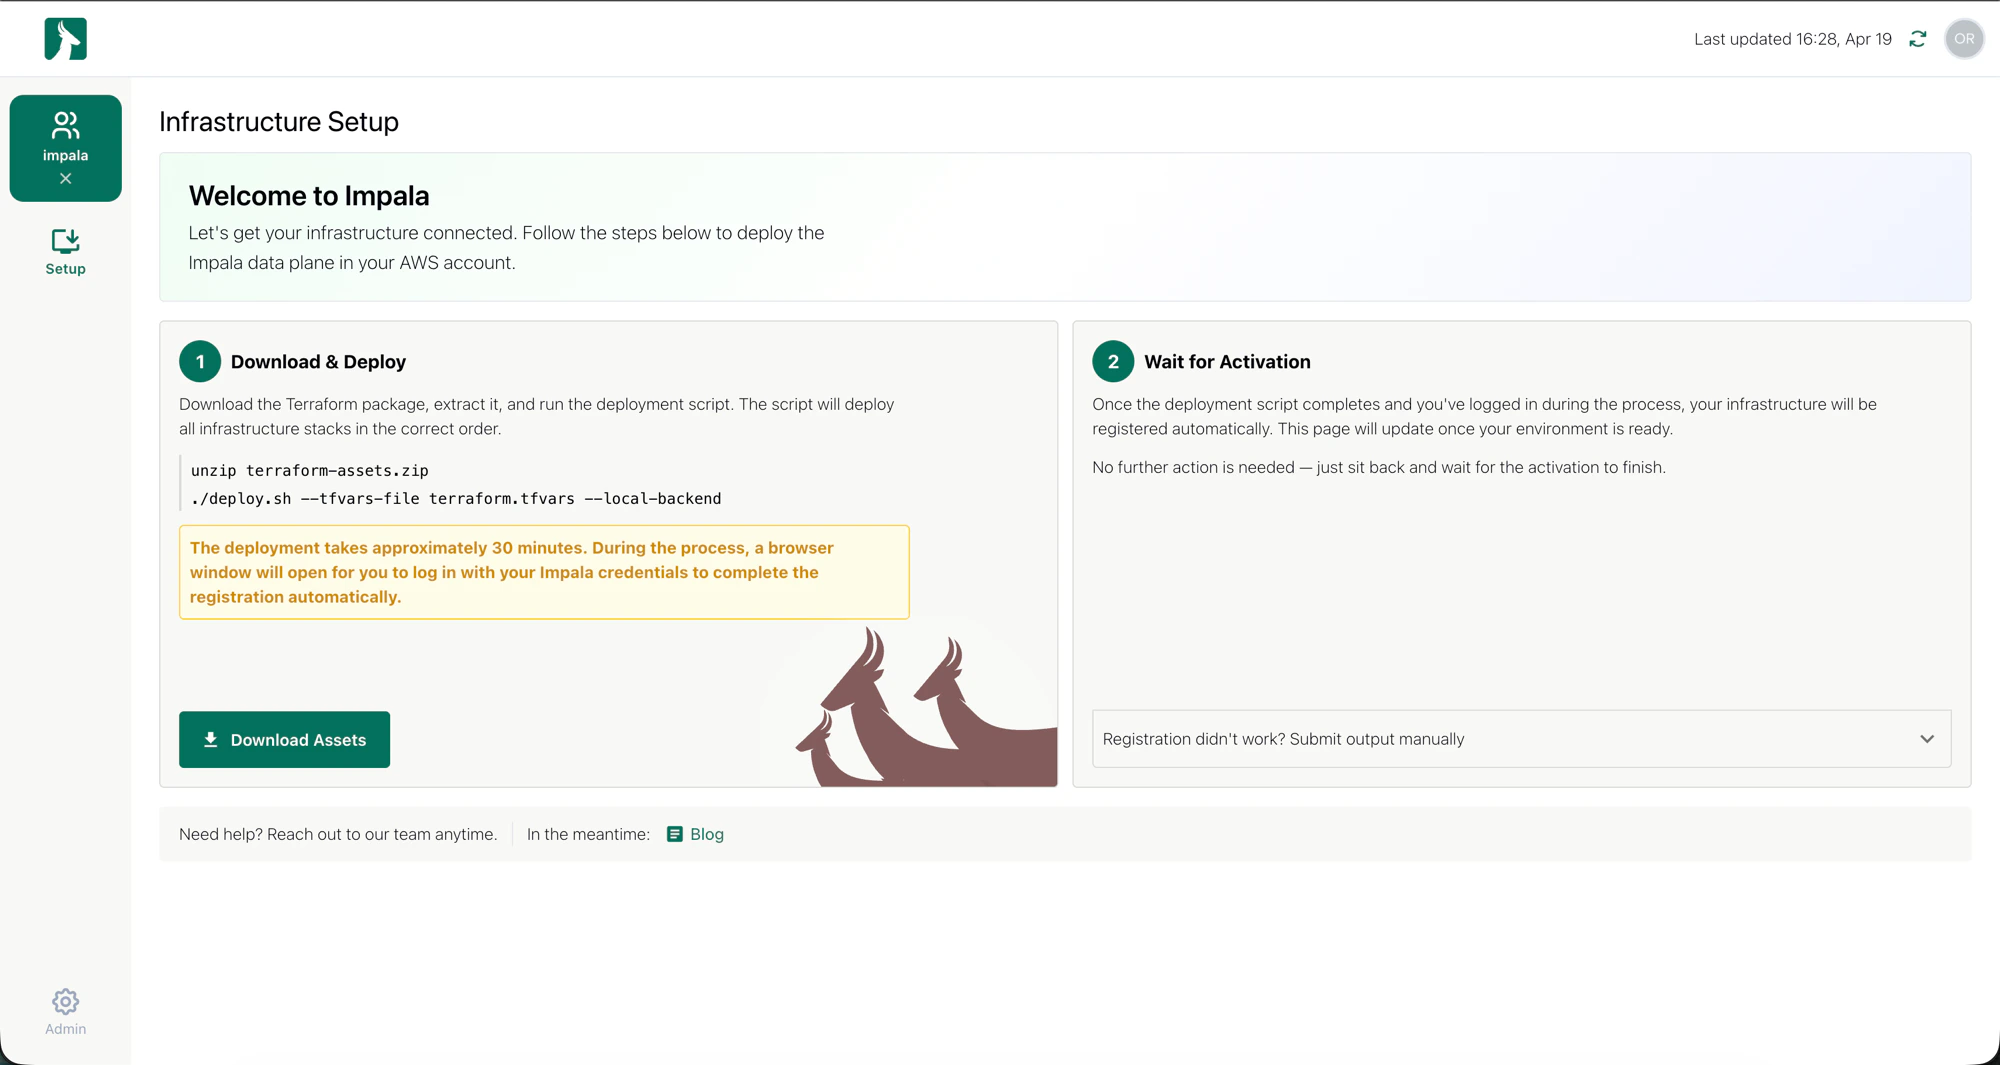 ***
## Step 2 — Run the deployment script
Open a terminal and run:
```bash theme={null}
unzip terraform-assets.zip
./deploy.sh --tfvars-file terraform.tfvars --local-backend
```
The script deploys all infrastructure stacks in the correct order. This takes approximately **30 minutes**.
During the deployment, a browser window will open automatically. Log in with your Impala credentials when prompted — this completes the infrastructure registration. Don't close the terminal while this is running.
***
## Step 3 — Wait for activation
Once the script finishes and you've logged in during the process, your infrastructure registers automatically.
Go back to the Impala platform — it will update to confirm your environment is ready. No further action needed.
If the page hasn't updated after the script completes, use the **"Registration didn't work? Submit output manually"** option on the setup page to send the deployment output to Impala's team.
***
## You're in!
Once activation is confirmed, you'll land on the Impala dashboard. You'll see your run history, cost, and token usage here.
***
## Step 2 — Run the deployment script
Open a terminal and run:
```bash theme={null}
unzip terraform-assets.zip
./deploy.sh --tfvars-file terraform.tfvars --local-backend
```
The script deploys all infrastructure stacks in the correct order. This takes approximately **30 minutes**.
During the deployment, a browser window will open automatically. Log in with your Impala credentials when prompted — this completes the infrastructure registration. Don't close the terminal while this is running.
***
## Step 3 — Wait for activation
Once the script finishes and you've logged in during the process, your infrastructure registers automatically.
Go back to the Impala platform — it will update to confirm your environment is ready. No further action needed.
If the page hasn't updated after the script completes, use the **"Registration didn't work? Submit output manually"** option on the setup page to send the deployment output to Impala's team.
***
## You're in!
Once activation is confirmed, you'll land on the Impala dashboard. You'll see your run history, cost, and token usage here.
 From the sidebar you can:
* **Home** — dashboard overview
* **Usage** — where you see your runs
* **API Keys** — manage your Impala API access
* **Playground** — test models directly from the UI
Your next step is running your first batch. See: [**Upload and run your first batch**](run-your-first-batch)
## Need help?
Reach out to your Impala contact directly.
From the sidebar you can:
* **Home** — dashboard overview
* **Usage** — where you see your runs
* **API Keys** — manage your Impala API access
* **Playground** — test models directly from the UI
Your next step is running your first batch. See: [**Upload and run your first batch**](run-your-first-batch)
## Need help?
Reach out to your Impala contact directly.